One of the great features of the ZFS filesystem is the snapshot function. With this, you can easily and efficiently backup the current state of the filesystem. Let us assume you have a fileserver and accidentally a user deletes some important folders. With the snapshot functionality you can rollback this modification quicker than with every backup.
These feature can also be used to easily replicate your Storage to another device to ensure data safety and high availability. In difference to a traditional backup the snapshot makes a 1:1 replication of your ZFS filesystem. In case of a disaster you can simple map your network shares to the second storage and it works. Traditional backups are usually not directly accessible by the client. However, ZFS replication is in my opinion not a replacement for a traditional backup. Therefore we make both in our company: Every hour a new snapshot is created on our main storage and replicated to a failover second storage. Every night both storage devices backup to a S3 instance.
In this blog entry I will give a brief introduction how to replicate the iocage dataset (which contains the jails) to a second (backup) TrueNAS device with the possibility in case of an emergency to start the jails on the backup device. This time I will use the admin interface.
In this scenario I have two TrueNAS devices:
- The first (main) device
- The second (backup) device
1. Create a periodic snapshot task on your first (main) TrueNas storage device
Login into the admin interface of your TrueNAS device ans select “Tasks” and than “Periodic Snapshot Tasks”. Press add and create a new task:
- As dataset select your pool and than the iocage dataset, in my case: Data/iocage
- Check “Recursive”
- “Snapshot Lifetime”: You are free to select a Snapshot Lifetime. This defines how many days or weeks you can rollback your data. In this example I selected 1 WEEK
- “Naming Schema”: This can be left with the default settings.
- “Schedule”: Defines how often a snapshot is created. In my case I want to create a snapshot every hour. Depends on your needs and also storage capacity, every day, every week or every month can be the right choice. Also a custom value is possible.
- “Begin” and “End” is adjusted based on the selected Schedule.
- Enable “Allow Taking empty Snapshots”
- Enable “Enabled”
- Finally press save


2. Create a SSH connection to your second (backup) device
In this step we will create a SSH connection to the second (backup) TrueNAS device. This is necessary for replication. Select “System” and than “SSH Connections” on the first (main) device:
- Press “Add”
- Enter a “Name” for the SSH connections, I use the name of the other device, in my case “LittleAlice-1”
- “Setup Method”: Select “Semi-automatic (FreeNAS only)”
- “TrueNAS URL”: This can be the hostname or the IP of the second storage.
- “Username”: the username to login on the other device, e.g. root
- “Password”: The password the user on the other device.
- “Private Key”: Select “Generate New”, than the two devices exchange automatically there keys.
- “More option”: Leave the default settings
- Press “Submit”
Now the SSH-Connections is configured.


3. Create the iocage replication task between the two TrueNAS devices
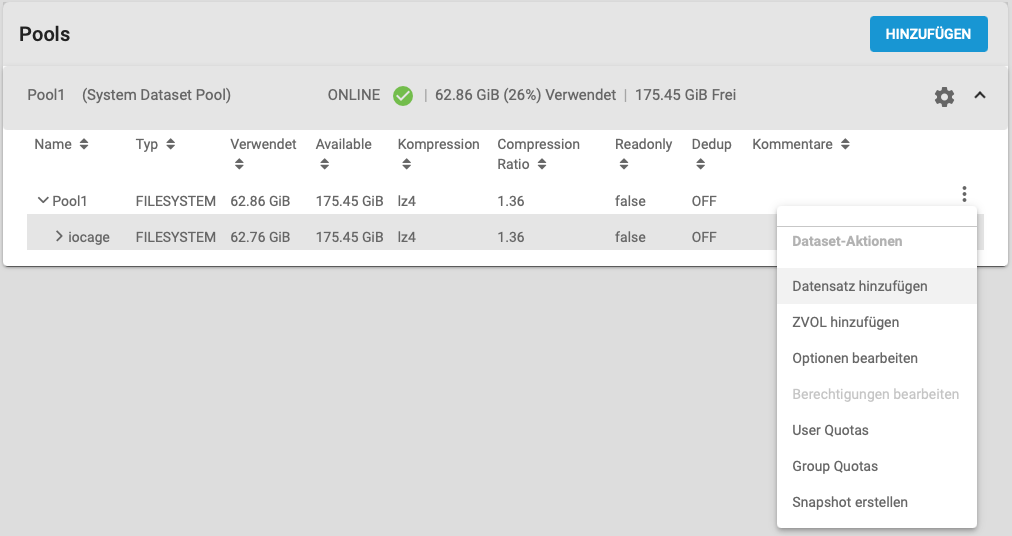
First, login to the second (backup) TrueNAS device and create the “iocage” dataset manually:
- Select “Storage” and than “Pools”
- If not already done create a new Pool. I will not go into detail how to do this.
- In the Pool create a new dataset called “iocage”, leave the default options.
- Finally the Pool list should look the following way:
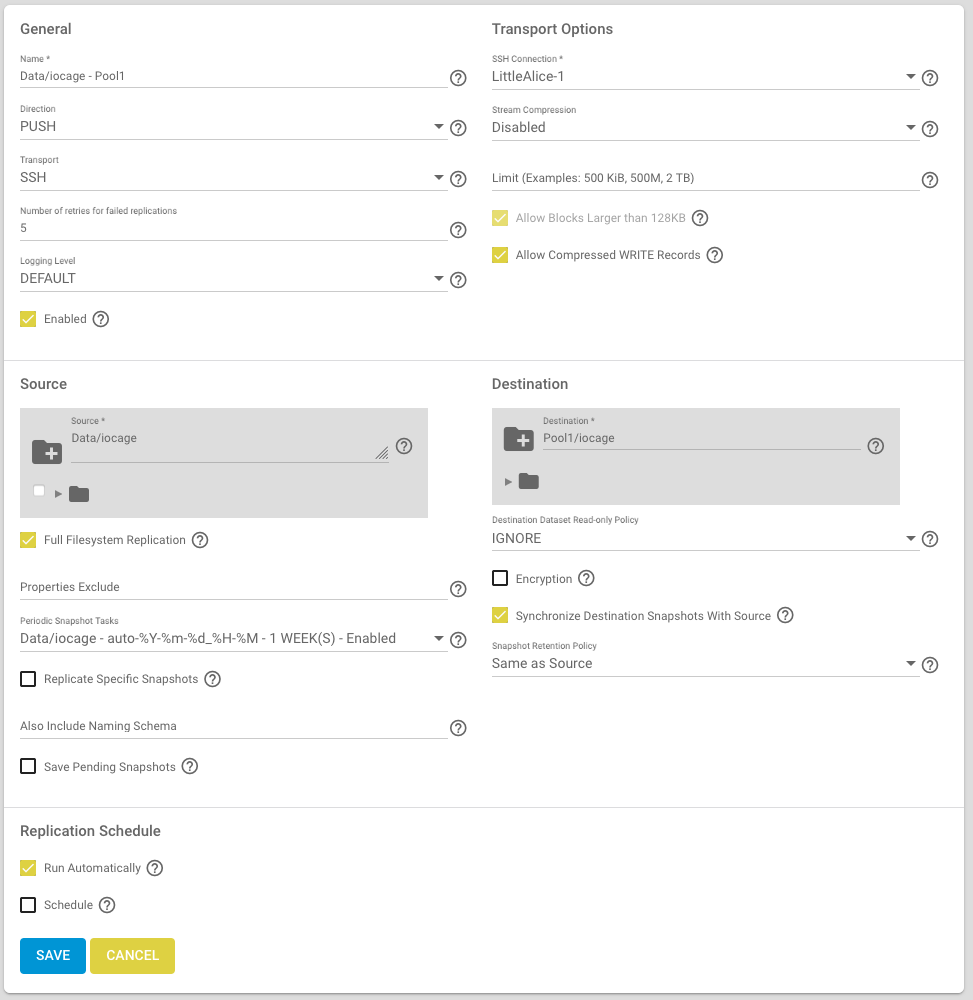
No you can go back the the first (main) TrueNAS device and select “Tasks” and “Replication Tasks”:
- Press “Add”
- Press “Advanced Replication Creation”
- Give the Replication Task a name under “Name”, in my case Data/iocage – Pool1
- “Direction”: PUSH
- “Transport”: SSH
- “Number of retries for failed replications”: 5
- “Loggin Level”: DEFAULT
- “Enabled”: Checked
- “Source”: Select the iocage dataset
- “Full Filesystem Replication”: Checked
- “Periodic Snapshot Task”: Select the one we created in step 1.
- “Replicate Specific Snapshots”: unchecked
- “Save pending Snapshots”: unchecked
- “Run automatically”: If checked this task is always executed after the “Periodic Snapshot Task” form step 1 has been executed. You can also define your own Schedule or run manually.
- “SSH-Connection”: Select the SSH connection we created in step 2
- “Stream Compression”: I have unchecked this, because I replicate to a device in the local network, which has enough throughput.
- “Limit”: Leave the default value
- “Allow Block Larger than 128KB”: Leave the default setting
- “Allow Compressed WRITE Record”: Leave the default setting
- “Destination”: Select the iocage dataset on the second TrueNAS device. This only works if the SSH connections could be created successfully.
- “Destination Dataset Read-Only Policy”: I selected IGNORE because I am sure that on the second device there will be no changes to the iocage dataset, excepted in an emergency case. The advantage of this approach is that you do not have to disable the readonly mode on the second device in case of an emergency. But this approach can lead to inconsistent data and in worst case, you loose data. Therefore be very carefully! If you are not sure select SET.
- “Encryption”: If you want to transfer the data encrypted check this option.
- “Synchronize Destination Snapshots With Source”: checked
- “Snapshot Retention Policy”: Same as Source
- Finally press “Save” and you will come back to the overview.
Now you can wait until the replication starts automatically, or you start the replication task manually by selecting the created replication task and press run. Depending of the size of the iocage dataset the replication can take a while.
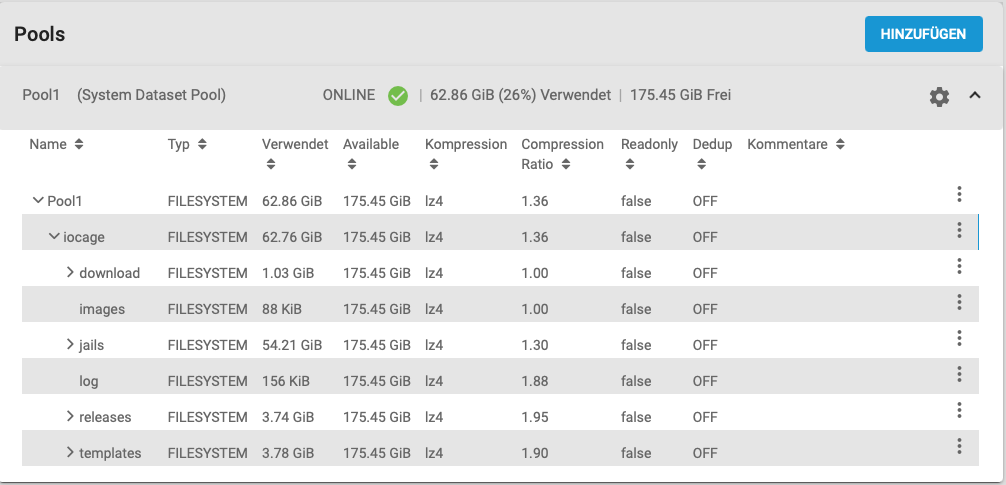
But if everything works after a while you should be able to see the replicated iocage on the second (backup) device:
4. Checking the replication on the second device
After a while login to the backup device an than select “Storage” and than “Pools”. Now you should see the replicated iocage dataset:
Congratulation you have successfully created a periodic snapshot task and a replication to another device. Feel free to post any comments.
